Wireless Camera User Manual

Before using this camera, you should know

  1. The camera is with a power supply and MUST be connected all the time when it is working.
  2. Do not connect too many devices to the router.
  3. The camera and phone should connect to the same Router Wi-Fi during your setup.
  4. The Wi-Fi password of the Router.(No special character and Wi-Fi SSID such as @#$%^*)
  5. Phone, camera, and router should be within about 8 feet during connection. After connecting, the camera can be moved to any place in a range of Wi-Fi.
  6. The fluency of video depends on network quality; refresh the video when it is stuck or try to connect one more time if the camera loses connection.
  7. This User’s Guide is written based on iOS devices. And Android devices are roughly the same.
  8. Software and hardware updates will not be notified separately.

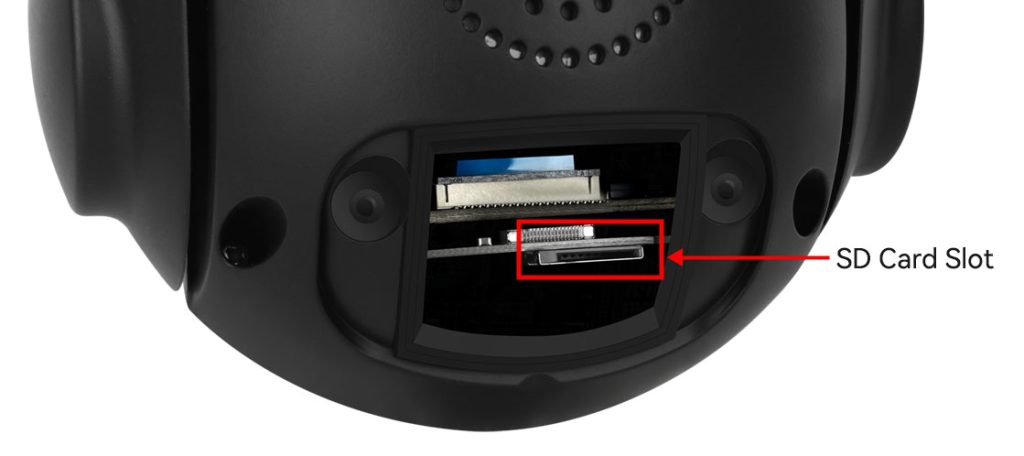
Install Micro SD Card

The instructions on how to install a Micro SD card are shown in the figure.

SD-Card-Slot

Connect Camera with Power Adapter

Connect the power adapter and network cable to the camera, and make sure that the network cable can be connected to the internet.

Cable-status

When the green network indicator keeps blinking, it means the network data transmission is normal.
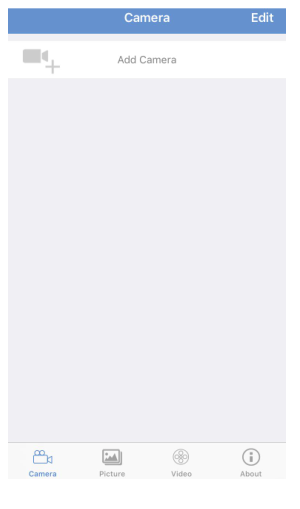
Mobile APP Download

Download “CamHiPro” from the Google Play Store /Apple App Store or access our support page to download it.

NOTE: Please allow below ALL permissions when you open Camhipro for the first time.

  1. Allow Camhipro to access mobile cellular data and wireless LAN, otherwise it can not add camera.
  2. Allow Camhipro to receive pushed messages, otherwise the phone will not receive alarm messages even the camera detectes a motion.
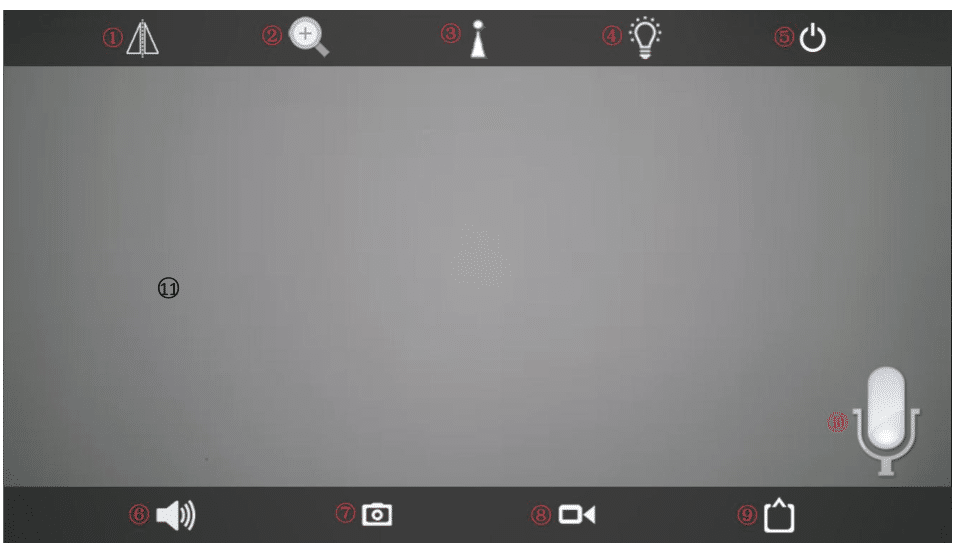
  3. Allow Camhipro to use the microphone when you want to use the 2-way audio function.

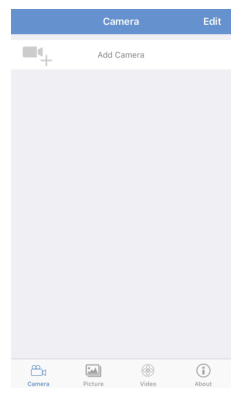
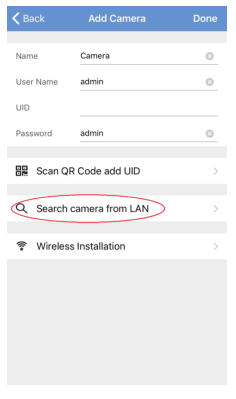
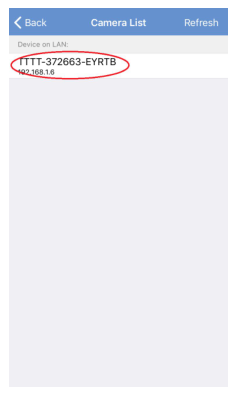
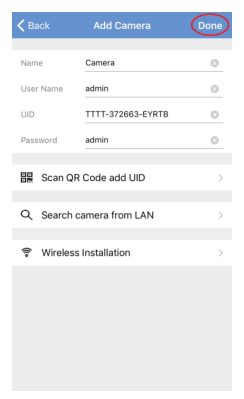
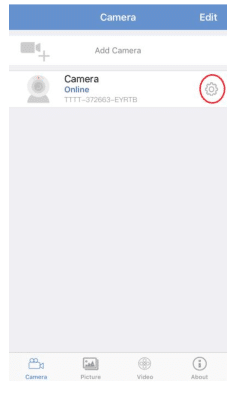
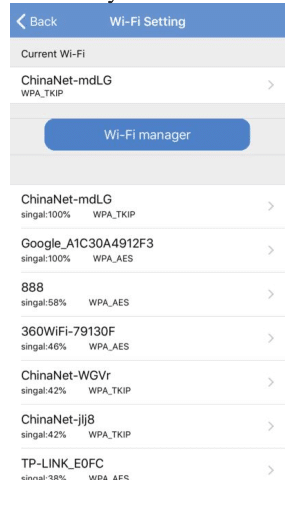
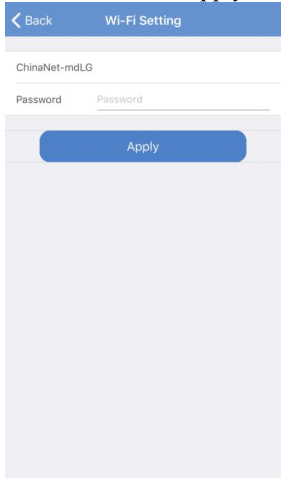
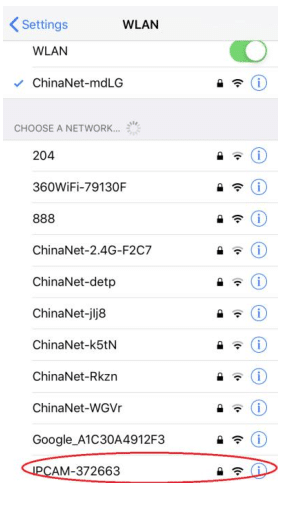
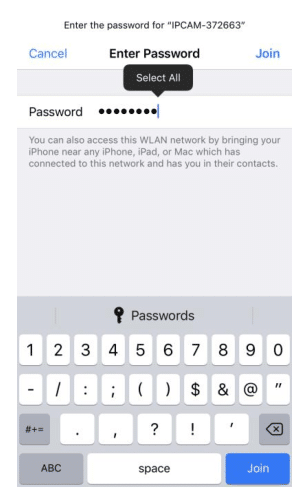
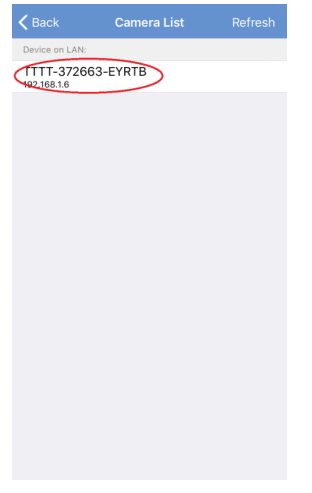
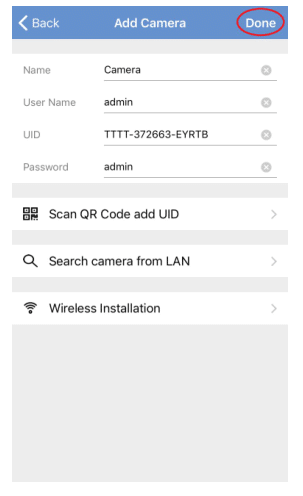
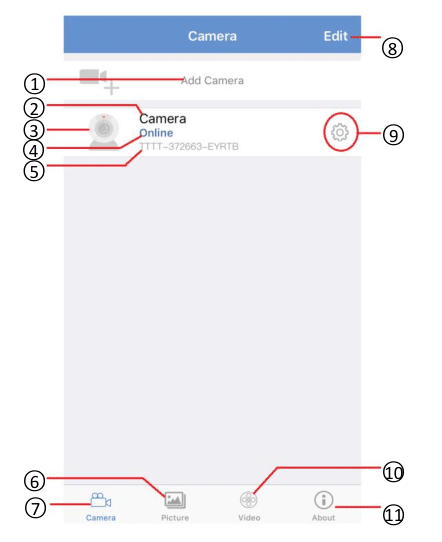
WiFi Camera CamHipro APP Connection

Wired connection setup steps(Recommend):

1. Connect the camera to power and Lan

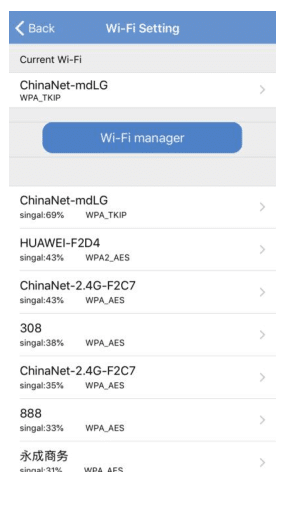
2.Connect smart-phone to the same LAN/Wi-Fi

After setting the Wi-Fi successfully, disconnect the Ethernet cable and wait for 30 seconds; then, you can view the camera wirelessly.


Wireless connection setup steps

Connect camera to power

Next, follow the before steps of Lan connect way as to connect to Wi-Fi. After setting the Wi-Fi successfully, disconnect the Ethernet cable and wait for 30 seconds; then, you can view the camera wirelessly.


Main interface instruction

  1. Add camera
    Press to add new camera
  2. Camera name
    Default, not support modification
  3. Preview screen
    Screenshot of the live video of the last exit
  4. Connection Status
  5. Camera’s UID
  6. View a screenshot of the camera
  7. Main Menu
  8. Edit
    Press to choose the camera to remove from your app. You can also remove the camera by swiping the bar.
  9. Camera Setting
    More detail refers to 5. Camera Setting Instruction
  10. Video
    View record video when you insert an SD card. More detail refers to 6. View Record Instruction
  11. About
    To view the App version.

Live video stream on smartphone

The timestamp is displayed in the top right corner of the video.

  1. Mirror or Flip the image
    Click to choose twisted side to side or flip up-down.
  2. This device does not have this feature
  3. This device does not support this function
  4. This device does not support this function
  5. Exit live video
    Click to exit the camera.
  6. Audio
    Click to turn on/off speaker.
  7. Screenshot
    Click to take a screenshot of the monitor on your phone. You can view the record screenshot in 3.1 Main interface instruction – 6.
  8. Recording
    Click to record the video on your phone. More detail refers to 3.4 View Record Instruction.
  9. Resolution
    Click to choose the camera resolution SD/HD.
  10. Microphone
    Click and hold to speak to the camera.
  11. Display
    Finger sliding to Zoom in and out.

Camera Settings Instruction

Change Password

    1. Old Password
      Enter the old password. (The default password is admin.)
    2. New Password
      Enter the new password.
    3. Confirm Password
      Enter the new password again.
    4. Show password
      Enable the password to be shown in clear text.
    5. Apply
      Click to save.

Alarm Setting

  1. Motion detection enable/disable
    Enable motion detection, which will show the following settings: (The default settings is disabled)
  2. Motion detection area
    Drag to define the detection area. The camera will only detect motion in selected areas.
  3. Sensitivity of motion detection
    Drag to adjust sensitivity, the higher the level, the more sensitive.
  4. Apply
    Click to save.

Action with Alarm

  1. Alarm Notification enable /disable
    Enable to allow the app to push notifications to your phone. (The default settings are disabled
    )
  2. Alarm SD REC enables/disable.
    Enable to allow recording of the alarm video on an SD card. You should install an SD card first. (The default settings are disabled)
  3. E-mail Alarm with Picture enable/disable
    Enable to allow E-mail alarm to come with picture snapshots. Should enable Email Settings first. (The default settings are disabled)
  4. Save Snapshots on FTP Server enable/disable
    Enable to allow app upload alarm snapshots on FTP Server. Should enable FTP Settings first. (The default settings are disabled)
  5. Save Video on FTP Server enable/disable
    Enable the app to upload an alarm video to the FTP server. Should enable FTP Settings first. (The default settings are disabled)
  6. Snapshot Number
    Select the number of pictures sent by alarm E-mail. 1-second interval for each picture. (The default settings is 1)
  7. Alarm ringing linkage enable /disable.
    Enable motion detection, which will show the following settings: (The default settings are disabled).
  8. Sound type
    Click to select alarm music.
  9. Length of time
    Click to select alarm music duration.

Recording Schedule

  1. Set recording length
    From 15 seconds to 900 seconds. (The default settings is 600 seconds.)
  2. Record enable/disable.
    Enable to allow record on SD card. (The default settings is enabled.)
  3. Stream Setting.
    Select the file size of the recording. For more detail, refer to 3.3.6 Video Setting (In the default settings, the first stream of every recorded file(600s) is about 25 MB, about 3.6 GB for the record a day. In the second stream, every record file(600s) is about 10 MB, or about 1.4 GB per record a day. The default setting is First Stream.)
  4. Recording schedule
    None, will not record.
    All Day will record for 24 hours; loop records overwrite the oldest files. (The default setting is All Day.)
  5. Apply
    Click to save.

Audio Setting

  1. Input Type
    This device does not support this function.
  2. Input Volume
    Drag to adjust the speaker volume. The bigger the value, the louder.
  3. Output Volume
    Drag to adjust the microphone volume. The bigger the value, the louder.

Video Setting

  1. Bite Rate (Not recommend modification)
    The higher the bit rate, the more data is transmitted per second, the larger the record file, and the clearer the picture quality. (The default is 1536 in the First Steam and 512 in the Second Stream.)
  2. Frame rate (Not recommended modify)
    The higher the frame rate, the larger the record file and the smoother the picture. (The default is 20 in First and Second Stream.)
  3. Quality (Not recommend modification)
    The record image quality. The smaller the value, the larger the record file and the better the image quality. (The default is 1 in First and Second Stream.)
  4. Frequency
    Select Power Frequency. Incorrect frequency can cause the light to flicker. US and Canada select 60Hz. The default is 50Hz.
  5. Apply
    Click to save.

Wi-Fi Setting

  1. Current Wi-Fi
    Currently connected to Wi-Fi.
  2. Wi-Fi manager
    Click to display the Wi-Fi where your camera is found.

SD Card Setting

  1. Check the SD card status.
    Note: If the display is 0MB, the SD card has not been inserted, or the SD card has not been recognized.
  2. Format the SD card
    Click to format the SD card. All the files on the SD card will lost.

Time Setting

  1. Device Time
    The device’s local time, video time-stamp time.
  2. Sync with Phone Time
    Click to sync device time with phone time.
  3. Device Time Zone
    Click to select Time Zone.
  4. Phone Time Zone
    Display local Time Zone.
    Set the camera time and time zone.

NOTE: Please select the correct Device Time Zone in your area; otherwise, it will affect the record.

Email Setting

To enable email alarm, you should enable IMAP/SMTP Server in your Email Settings first.

  1. SMTP Server
    SMTP Server address. e.g. smtp.gmail.com
  2. Server Port
    SMTP Server Port. Enable SLL to encrypt port 465. Disable Encrypt the port is 45.
  3. Encrypt Type
    None, SSL, TLS, STARTTLS. Recommend SSL.
  4. Authentication Enable/Disable
    Recommend Enable.
  5. User Name
    The alarm E-mail sender’s name. e.g. enster@gmail.com
  6. Password
    The send e-mail SMTP server’s dedicated password is a 16-digit alphanumeric password. e.g. ABCD EFGH MIJK LMNO. Find the dedicated password in your E-mail settings.
  7. Send To
    The E-mail received the alarm. It can be the same as the Sender’s email. e.g. enster@gmail.com
  8. Sender
    The E-mail sends the alarm. e.g. enster@gmail.com
  9. Subject
    The alarm E-mail subject.
  10. Message Test
    Click to send the edited E-mail to send to E-mail to test if the E-mail alarm Setting is correct.
  11. Apply

FTP Setting

  1. Server Add
    FTP Server IP address. e.g. 192.168.58.xxx
  2. Server Port
    FTP Server Port. Usually, it is 21.
  3. User Name
    FTP Server User Name.
  4. Password
    FTP Server User Password.
  5. Passive Mode Enable/Disable
  6. Path
    The Server Path to save recorded video and images.
  7. Test FTP Settings
    Click to test FTP Settings.
  8. Apply
    Click to save.

System Setting

  1. Reboot Camera
    Click to restart the camera, all settings will be saved. No need to reconnect.
  2. Reset Camera
    Click to restore factory settings, all settings will restore the default. Need to reconnect.

View Record Instruction

Display all connected cameras.

  1. Online
    Recording saved on the SD card. Click to view the recording. For more detail, refer to 6.2 Recordings Instruction.
  2. Local
    Recording saved on the phone. Click to view the recording.

Recordings Instruction

  1. Search Time
    The default Search Time is the last 6 hours.
  2. Recordings
    Click to view Recordings.
  3. Recordings File Time
  4. Search
    Click to Search the Recording times. (Within an hour/Within half day/Within a day/Within a week/Custom) Custom-only display records for up to one week at a time.
  5. Recordings Size

Auto Cruise and Human Track Setting

ModelPreset PositionAuto Cruise(ON/OFF)Human Track (On/Off)Reset All Presets
D01XH8-36X-FSet 1-8ON: Call 93
OFF: Call 94
ON: Set 92 and Call 92
OFF: Call 94
Call 115


PC Software

Download HiP2P client for Windows/MacBook from:

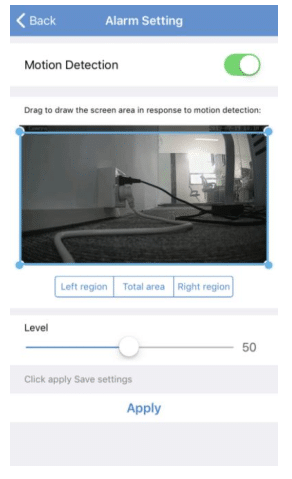
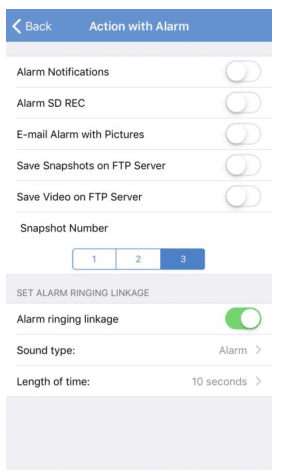
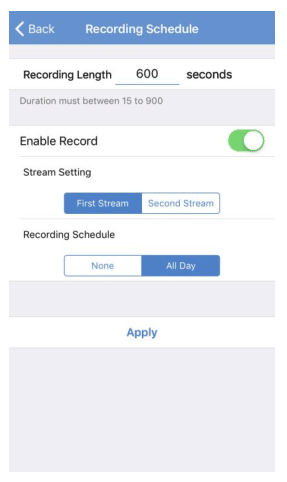
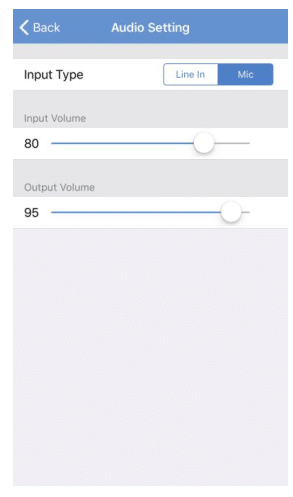
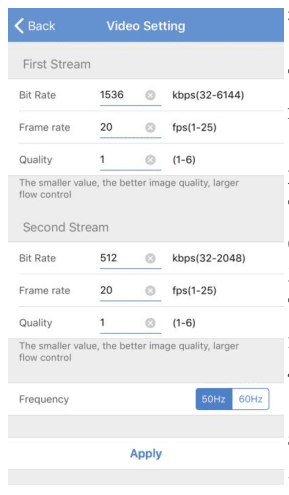
Enter detailed settings:

User Name: admin; Password: no need to fill in.

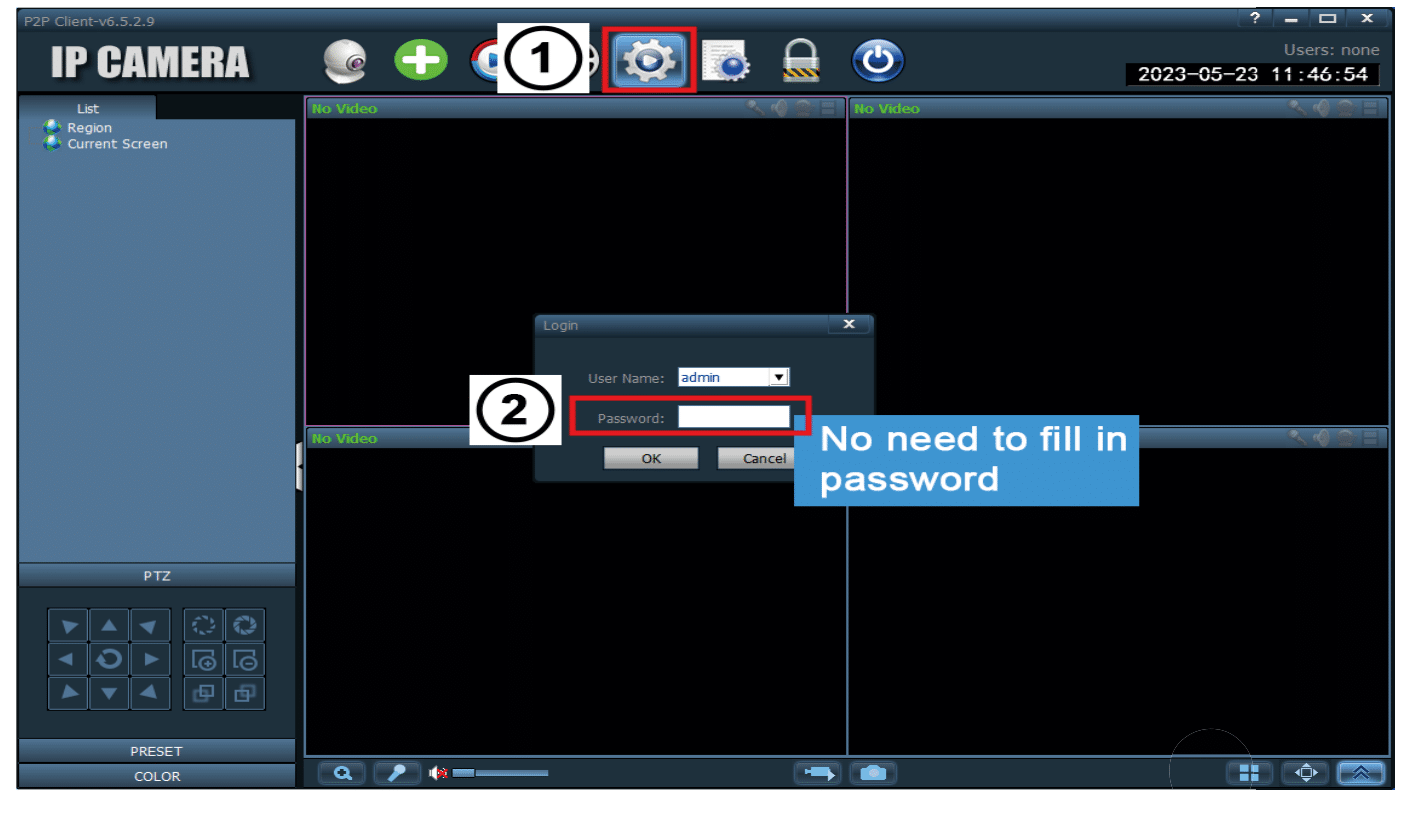
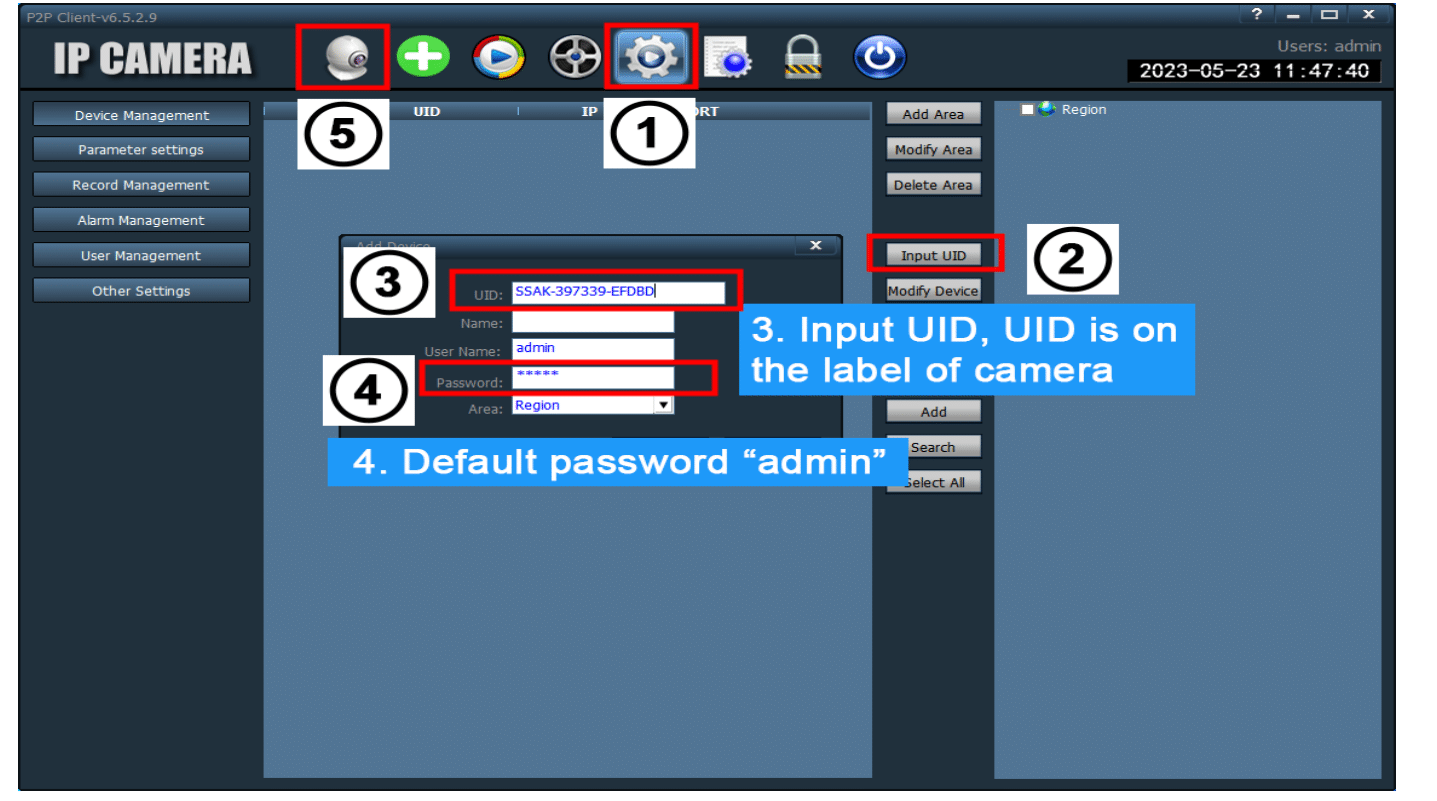
Note: If it does not show up in the camera image, please drag the camera UlD under Region Select to the right box.

FAQ

The device prompts offline.

  1. Before adding the device, please make sure the device is connected to the power supply through the power adapter
  2. Allow Camhipro to access mobile cellular data and wireless LAN. Otherwise, it cannot add a camera
  3. If it is a dual-band router, please check whether the camera supports 5GHz Wi-Fi; if not, please use 2.4GHz Wi-Fi.
  4. Make sure the Wi-Fi password is correct. (Note: WiFi passwords cannot contain single quotes, underscores, spaces, and slashes (/)
  5. Please check the number of devices connected to the router; if the number of devices connected to your router exceeds the maximum limit, other devices will not be able to connect to the router.
  6. Check that the wifi coverage in the current location is good, and the network is stable(wifi signal is greater than 80%);
  7. Avoid using wifi extenders;
  8. After checking the above information, if the camera cannot connect to WiFi, please try to re-download the APP, reset the camera, restart the router, and then add the camera again.

Reset the camera

  1. Make sure the camera is connected to a power source with the power adapter.
  2. Press and hold the reset button on the camera tail line for more than 10 seconds; when the camera makes a burst of music, release the reset button.
  3. Wait for 60 seconds; the camera will restore to factory settings

Turn on the alarm notification.

  1. Allow Camhipro to receive pushed messages. Otherwise, the phone will not receive alarm messages even if the camera detects a motion;
  2. From the phone setting, allow CamHipro notification to be accessed by WLAN & Cellular data.

How do we reduce false alarm notifications?

  1. Turn on the AI alarm to automatically identify humans/vehicles/pets;
  2. To enable linkage trigger from alarm trigger, it is necessary to meet both motion detection alarm and AI alarm, which can effectively reduce 95% of false alarms.

No video recording

  1. Make sure the camera has turned on the SD card plan recording button.
  2. Make sure the Micro SD card is correctly inserted and recognized successfully. If the camera does not recognize the SD card, please disconnect the camera and reinsert the SD card into the camera.
  3. SD cards are recommended for use in SanDisk, Kingston, Samsung, Toshiba, PNY Bianwei, Lexar, and other brands.

Table of Contents